"SURPRISE! You're a STAR!" Mousse Cake with mirror drip glaze.
If you have a favorite mousse recipe, you can feel free to adapt it to this technique. The following rule applies to ALL mousse cakes made with both the interior surprise AND the glaze: (1) whichever mousse you choose to use as the interior image mousse, it must be frozen solid in order to be handled properly (2) the mousse cake, once finished and ready for glazing, must be FROZEN and the glaze should register between 90-95ºF.
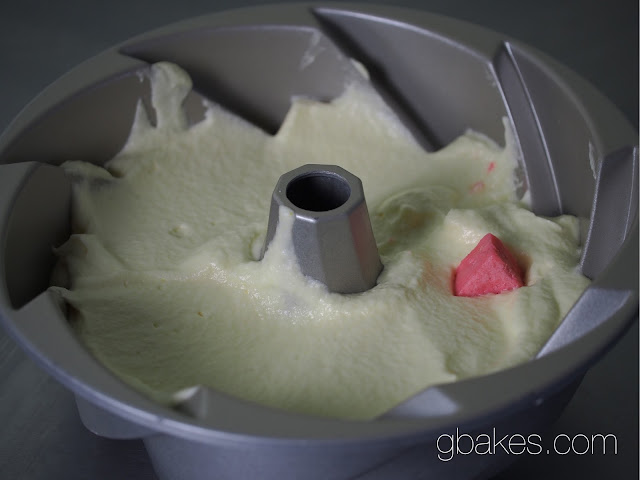
Before we get into the photo montage, let me just state unequivocally that you shouldn't use a traditional metal bundt pan for this cake. It won't unmold, at least not easily. So while the following does a good job of visually explaining how to make the surprise inside, if you use a metal bundt the real surprise is that it will NEVER RELEASE! Instead, invest in a silicone bundt pan like these. That's what I did after spending hours gently heating the sides of this bundt pan only to end up with soup. With silicone, you can just peel that sucker off the frozen mousse.
SURPRISE! YOU'RE A STAR! Mousse Cake
For the mousse
NOTE: For the surrounding/outer mousse, use a double recipe. Make the inner/image mousse first and spread it into a parchment lined 9" x 13" pan and freeze solid. Once frozen, make the double recipe for the outer mousse.
1 tablespoon unflavored, powdered gelatin
1/4 cup plus 1/3 cup water (cool)
1 cup fruit purée
1 cup sugar
5 egg whites
pinch salt
1 1/2 cups heavy cream
1/2 cup mascarpone cheese
Pour 1/4 cup water into a microwave safe bowl and sprinkle the gelatin in an even layer over the water and allow to sit for about 10 minutes or until the gelatin looks completely saturated, like wet sand.
NOTE! Always use cool water to bloom gelatin. If it's too warm, only the outer portion of the granule with absorb water and the gelatin won't melt once warmed .
Microwave the gelatin mixture on 50-percent power for 20 seconds at a time, swirling the bowl between each heating, until the gelatin is completely melted. Be careful not to overheat because this can kill the efficacy of the gelatin. You want to time the melting of the gelatin so that it is still liquid when you incorporate it into the cold whipped cream mixture it's tough to fold in gelatin that has already solidified. You'll end up with chunks.
In a medium saucepan, gently heat the purée (I used passion fruit puree for the outer mousse and strawberry puree for the inner/image mousse) and stir in the gelatin mixture. Set aside.
In a heavy saucepan over low heat, combine the sugar and 1/3 cup water. Stir until the sugar completely dissolves. Wash down the sides of the pan with a damp pastry brush. Clip on a thermometer, stop stirring, and heat the syrup to 234ºF.
Meanwhile, whisk the egg whites with salt in the CLEAN bowl of a stand mixer until foamy. When the sugar reaches the correct temperature, lower the speed of the mixer to medium-high and carefully pour the hot sugar syrup down the side of the bowl. Once all of the syrup has been added, increase the speed to high and whip until the meringue is a shiny, bright white and maintains stiff peaks when you lift the whisk attachment. Transfer the meringue to a metal bowl and set aside.
Using the same mixing bowl the meringue was in (you don't have to clean it), add the heavy cream and mascarpone and whip until they achieve medium-stiff peaks.
Combine the whipped cream and meringue, gently folding the two together.
Add 1/2 cup of the cream meringue mixture to the purée and whisk to lighten.
Quickly add the gelatin-purée mixture, make sure the gelatin mixture isn't too warm or the cream-meringue mixture will break and deflate. But also make sure that the gelatin hasn't cooled so much that it's begun to set-it should be fluid so you're not left with nibs of Jell-O in the mousse. Work quickly to ensure a smooth, silken texture.
For the surrounding mousse, gently spray the mold with non-stick cooking spray and add a little more than half into your surrounding mousse into the silicone mold. Using a cookie cutter that is no taller than the height of the silicone bundt pan, stamp out shapes from the frozen interior/image mousse and gently push them into the surround mousse. You can see I used TWO cutters and punched an image out of the larger shape. This gives you more bang for you buck surprise wise. Make sure to place the shapes as close together as you can so that you get more surprise for each slice. Spread the remaining mousse over the images and freeze until solid, preferably overnight.
For the glaze
25 ounces white chocolate, finely chopped
12 ounces cool water, divided
20 ounces sugar
14 ounces sweetened condensed milk
1.5 ounces granulated gelatin
gel dye
Place half the water in a bowl and sprinkle the gelatin evenly over the water. Allow to sit until the gelatin is uniformly soaked and looks like wet sand. Once the gelatin is bloomed, move onto the next step.
In a heavy saucepan, combine the remaining water, sugar and sweetened condensed milk. Stir over low heat until the sugar has completely melted. Take from the heat and stir in the gelatin. Continue stirring until the gelatin is melted.
Place the white chocolate in a shallow bowl and pour the hot gelatin mixture over the chocolate. Shimmy the bowl to make sure the chocolate is covered. Allow to sit until the chocolate is melted, add a few drops of gel dye (color is your choice!) and then whisk until smooth. Pour the mixture through a sieve and into a pitcher with a spout and melt occasionally, checking the temperature often. Once the temperature has reached 95ºF, unmold the mousse cake from the silicone mold and place on a cooling grate over a parchment lined sheetpan. Pour the glaze over the frozen mousse cake, making sure not to return to an area of the cake you've already covered otherwise the finish will be lumpy. Serve immediately or refrigerate for 1/2 hour before serving. Using a very hot, clean knife to make each slice.


